Apple now offers end-to-end encryption for iCloud data, which means that not even Apple has a backdoor to see what you keep on your iPhone or what you upload to the iCloud. But this feature only exists if you turn it on. It’s called Advanced Data Protection.
Let’s start with a simple metaphor to explain why this is still an optional feature. Why not make end-to-end encryption that default for all Apple devices? This is a valid question, and one that even my parents asked me the other day when I shared this. Here’s how I described it to them.
Understanding encryption
Try to think of iCloud like a hotel room. Now, when you check into your hotel, they give you a key to access your room. Your room, and all your belongings are locked up while you’re gone, but the maids still have a master key to get in and clean the room, and if you happen to lose your key, the hotel can issue a new one. This is what you would call a “Shared key”.
Now, imagine for a moment that the hotel gave the option to book a super private room they called the “Encryption room”. It was locked with a private key that had no duplicate whatsoever. Maids could not enter, and the hotel couldn’t issue a replacement key. It was your key and yours alone. Now, this isn’t a perfect analogy, but this is end-to-end encryption. It’s better security, but it’s also a greater responsibility. I can imagine that before the hotel gave you that private key, they would make you sign a waiver that said you understood all the risks involved. I mean, if you left something in your room and then you lost your key, your possessions would be lost forever, at least metaphorically speaking.
And the same goes for encrypted data. Apple recognizes that not everybody wants that kind of responsibility, and as you’ll see in the setup process, they go to great lengths to make sure you take full responsibility for this kind of encryption.
What does Apple encrypt?
To back up for a moment, you should know that certain data on your Mac and iPhone has already been encrypted for a while, whether you knew it or not. For example, Apple’s iCloud keychain to store your passwords was encrypted, as was any Health data that all of your devices collected. But if you remember from a little over a year ago, Apple announced that they would start scanning our photos for any illegal content, and that was the first time that most people realized that their data wasn’t entirely encrypted. The privacy that Apple had been preaching didn’t feel so private anymore. Now, I know some people who question why such extreme privacy is needed, and many of those people belong to law enforcement, government agencies, or apparently the New York Times.
But the reality is this, in the same way that I think it’s good that we have the right to protect valuables by purchasing a personal safe box that doesn’t have some kind of master key or backdoor loophole. I believe the same standard applies when protecting my personal data as well. Honestly, I’m not exactly sure why Apple made such an abrupt change over the past year with their privacy stance, other than perhaps the harsh criticism and swift backlash from their user base when they announced that, or maybe they’re bracing themselves for an inevitable breach of their iCloud system in the future, and they want to make sure that they’ve limited their own liability. I don’t know. Either way, this advanced data protection is a good thing for us as consumers.
The privacy encryption they now offer has been expanded to include your iCloud backup, your notes, your voice memos, and your photos. The only part of your data that doesn’t fall under the new advanced data protection is any iCloud mail, contacts, or calendars, which Apple says must remain unencrypted, in order to work with other apps and services. Now personally, I don’t use Apple’s mail or calendar apps anyway, so I’m perfectly fine with that.
Step-by-step tutorial
I’m going to take a moment to show you exactly how to turn on advanced data protection and the challenges you might come up against and let me warn you before you start. This is a simple, five-minute setting change that could take you an hour or more to complete as you’ll see why in a moment.
Everything starts in your Settings app of the iPhone, iPad, or even Mac device that you own. Click on your name at the very top to access your Apple ID and then find the iCloud settings. At this point, you’ll need to scroll down and look for the Advanced Data Protection toward the bottom. Now, if you don’t see this as an option, that means that your device hasn’t been updated to the latest operating system (iOS 16.2 or later), so you’ll need to go into your Software Update and do that before you can proceed any further.
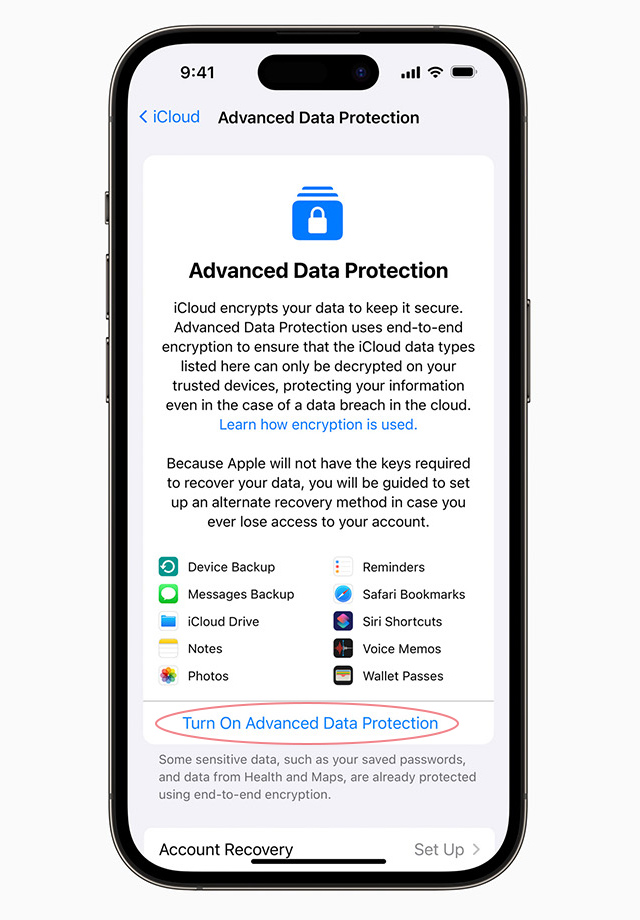
Now, once you’ve updated, click through to Turn On Advanced Data Protection. It’s at this point that Apple is going to enforce a number of requirements to enable this type of encryption. Now, I had to go through and update the software on my Macs, my iPad, and even my Apple TV, so hold on for just a moment.
Now, even more important are the requirements that you have two-factor authentication setup on your Apple ID, which I think most people do at this point. You have to have a passcode setup for your device for security purposes, which I really hope you do already. And finally, that you’ve set up an account recovery contact or a recovery key. Account recovery can be found in the Password & Security settings of your Apple ID. It’s also under the Advanced Data Protection settings as well. You only have to do one recovery method, but I recommend setting up both just to be safe. I’ve set my wife as the recovery contact, which took all of about 30 seconds to do, just make sure you choose somebody who you trust. And then I set up my recovery key, which took about five minutes. The reason it took longer, at least when I was using my phone, is that you’re required to copy down and then retype this 28-character code to verify that you have that you’ve stored it. And my fat thumbs just take a bit longer to get that typed in.
Now that all the requirements are met, I can finish the setup process. Now, Apple will warn you that you are now taking responsibility for your data, which you are. They’ll have you confirm your recovery contact, and then you’ll have to type in that 28-character recovery key again. Verify your phone’s passcode, and then you’re done.
I highly recommend you take the step to secure your data if you use Apple devices, but there is one reason why some people might not want to turn it on. And it’s simply this, don’t turn this on if you don’t want to be responsible for your own data. That’s not meant to be condescending at all. When I told my mom about this, her first response was exactly this. I don’t want to risk losing all my photos and notes just for a little extra encryption. And that’s something that you need to understand.
Greater privacy and security requires a higher level of personal responsibility that you take on for your own data and your own information.
You can’t mone and groan about companies like Facebook, Google, and Apple collecting data on you, and then get mad because you forgot your password. You can’t have the best of both worlds. Either you put your trust in them, or you put the trust in yourself. It’s your data, and that’s your call. Let me know if you have any questions in the comments below.